How Stringjoy Guitar Strings Are Made: Dialing in the Perfect Wind

Be sure to subscribe to our YouTube channel to keep up with more great videos like this one.
Video Transcription
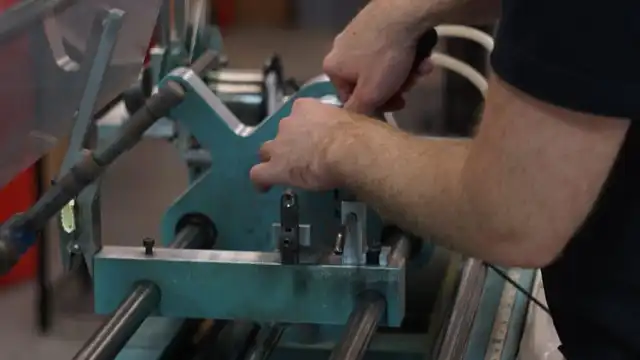
Hey, it's Scott from Stringjoy, and I'm here in our shop in Nashville, Tennessee. Today I'm going to show you a few things about how we make a guitar string. Specifically, we're going to look into how we dial in a given gauge of string to work just right. So there are really two different aspects of this. When we have a different gauge core wire and a different gauge wrap wire, it changes a lot about how quickly we need to be moving. Different elements of our equipment here have to shift around to get everything dialed in just right so that we have a string that sounds and plays perfectly. So when we first set up some new wire and get everything rigged up to start the winding process, it's a little bit of an iterative experience of trying different things, adjusting different elements to get everything just right, and then once we have that we can start going a little bit quicker and get our speed up. So what I'm going to show you today is going to be probably the slowest element of the process, but it's also probably my favorite element because it's really this dedication at the beginning of the process that results in a great string at the end. So for today's purposes, we're using 15-gauge hexagonal core wire. It has a ball-end on it already, it looks just like this. And we're going to be using 11-gauge, 8% nickel-plated steel wrap wire which comes on a spool. It looks kinda like this, It's over on that end of the machine. When you add that wire up, those gauges come out to 37. Remember we have a 15-gauge core wire, then you have to count the wrap wire, the 11, twice. So that's 22 plus 15—or 37. But the thing is, if we're doing everything right, we get a little bit of shrinkage there when everything compresses and gets around itself, so we should be ideally making a 36 here if everything meters out just right once we get it all set up properly. So these winding machines that you see here have been around a long time. They were made in the early '80s and they've passed through a lot of different companies hands, made a lot of different strings for different people along the way. Of course we've had everything heavily modified to work the way that we all want it to, but they've been around for a long time. They're workhorses, they make great strings. What's the coolest about them, is that even though they might look really sophisticated and advanced, it's actually all pretty simple. It's all very easy dials, knobs, and things that you're adjusting manually to get the strings to work the way that you want. It's not some big contraption you push a button on that just spits out a string. It's really just a, a very large tool that the operator is using to get everything to work exactly the way that they want it to to get the string that we want. So I'm skipping a little bit of this process here because I have everything already rigged up the way I need it to be in terms of how we're running our wrap wire over to here, and how we're sliding everything around to get everything to the exact length that we need it all to work, how we tighten everything up so that our core wire is being tuned to the right pitch that we want it to be for us to wrap our string. We're going to skip over that because it's already set up and I don't want to undo it. In a future video maybe we'll show you a little bit more about that. But the first thing we're going to do is we're going to load this core wire onto here and get everything stretched to tension so that it's ready to wind. Alright, so if we do everything just right, this core wire is going to tune to about a C for this particular string. It's going to have just the right amount of tension, make a little bit of a funny, twangy sound, and that means the core wire's at the right tension for us to wind. As you probably know, when you string up your guitar, your strings are being put under tension so we want to make 'em that way as well so that that's kind of what they're expecting and they'll perform well when you do get them to tension. Next up we have what a lot of the art of this is, we're just starting everything manually. We have to thread this wrap wire through the eyelet of the string, grab it with some pliers so that we can break it off so there's no tail end that's sticking out. Alright, now that we're ready to wind, there's a bunch of different things that we have to look at across the whole process, the whole length of the string, to ensure that our dampening is all happening at the exact place so that string isn't vibrating like crazy and getting the wraps on inaccurately. Most importantly, we have to make sure that we're keeping a perfect angle with how the wrap wire is hitting that core wire. If our angle isn't right, then we're either going to have too much space between the different wraps on the string or too little space and get everything way too tight. Neither of those things are good. So that requires us to really, really dial it in and look at everything and make sure that we're doing it right the whole way through. I think this is one element of the process where it makes a big difference how much care is really being put into it. You can just press a button and let this go, and it'll look like a good string, but when you string it up on a guitar, it's not going to intonate right, or play right, and if you were to keep it on your guitar for long it might break early. So this is where a lot of the important stuff comes in, is in getting everything dialed in properly. When we're first starting off with a new core wire and wrap wire combination, we run this excruciatingly slow so that I can help guide everything, help dial in everything in terms of those dampeners, the various speeds that are going on with the equipment to ensure that everything's happening just right. And so what I'm doing there is watching that line, watching the angle of the wrap wire the entire way through, watching my dampeners, making sure that everything is positioned just right. Ultimately when we string up some new gauges of wire, we're going to do this a couple of times, even at that excruciatingly slow pace to ensure that the strings that we're making are just right. At that point, we can speed up the process a little bit so that it's not taking quite so long. But we want to ensure that everything is perfect before we get there. Whenever I make that string, I'm always looking to make sure that my ball end, my eyelet is perfect there. I'm not having any wrap wire sticking out which could cause things to not intonate properly when you get them seated on your guitar. I'm always feeling my wrap as well to make sure that everything feels perfect to the touch. And we'll always string everything up on a guitar once we think we have everything perfectly dialed in as well, to playtest it and make sure that it sounds great and plays great. I think that's an area that some companies might not necessarily go all the way—they're not actually testing a string on a guitar at this point in the process. But for us, when we think we have everything just the way it needs to be, we want to know that that string is going to play great and sound great before we actually start making a bunch of them. That way we're ensuring that everything's going to be just right.Other Posts you may like

Guitar Strings Order: How the Guitar is Tuned and Why

Two Handed Tapping: Our Top 8 Tappers of All Time

Which Guitar Strings Wear Your Fret Wire Down More?
What is Nashville Tuning? Its History, Best Guitar Strings & Uses

Guitar Scale Length Explained: String Tension & Playability
What Guitar Strings I Used To Play...
0 Responses
Leave a Reply
Your email address will not be published. Required fields are marked *

