Electric Guitar Recording: Bringing the Studio to your Bedroom


If you’re a guitar player, you’re used to fiddling around morning, noon, and night searching for new riffs and interesting chord progressions. But when you’ve finally found what you’re looking for, how do you translate that into an electric guitar recording you’re proud of?
Since studios can be expensive (sometimes well over $100 an hour), and home recording equipment is becoming more and more affordable, it's worthwhile to learn how to record yourself at home.
Since there are different ways to do it, and lots of different software, it can be difficult to produce something you're happy with. That's why we're taking a look at the best ways to record a great guitar take in the comfort of your own home.
Today we're focusing on recording electric guitar, but if you're interested in learning about recording acoustic guitar at home, check out our article Recording Acoustic Guitar: Tips and Tricks for the Perfect Sound.
Choose between a microphone or recording direct
If you want to get the same natural, authentic tone you'd expect from a professional studio a good idea is to mic your electric guitar amp. This will allow you to use a variety of effects from pedals and pre-amps or harness the organic grit of amp distortion for electric guitar recording.
However, there are drawbacks. When using a mic you might catch a lot of interference from inside your house. Air conditioners, running appliances, hissing amps, or even the sounds of squeaky chairs and shuffling rugs can get picked up by the mic and end up tainting your recording.
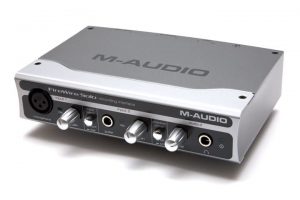
In order to get a more pristine electric guitar recording, you'll typically have to invest in more expensive mics and amps as well as sound-dampening equipment which can take a while to install. If you’re on a tight budget though, you can always plug your electric or acoustic-electric guitar right into a direct box (or DI box) and then run it into an audio interface (many interfaces these days have DI functionality built-in).
This will eliminate any need to soundproof your recording space and is a great option for those without tons of cash, as a good interface for home recording can cost in the neighborhood of $100. For most budget-conscious or beginner players, this is going to be your best option.
Choose a Digital Audio Workstation (DAW) for Electric Guitar Recording

After you’ve recorded your song, you’ll need software that can interpret your electric guitar recording and convert it into a suitable format. Professional studios have large expensive mixing consoles and outboard gear to manipulate nearly every aspect of the sound, but thanks to modern technology you can have access to everything you'll need from the ease of a laptop computer.
Programs such as Logic, Ableton, Reason, and FL Studio are fairly affordable (some lite versions cost only $99) and are easy to download onto a Mac or PC. If you want to spend more money though, Pro Tools is a very popular option. All Macs even come with a copy of Garageband, which is a great choice for beginners.
With these programs, you can record and edit your electric guitar recording to get a final product that sounds just like you had envisioned it. I personally love using Logic Pro X, because you have access to different types of virtual amps, speakers, microphones, pedals, and more.
These digital recreations don't quite sound as good as the mic'd version of a classic tube amp, but for a piece of software that costs $200, it's hard to beat.
Prepare your Instrument
Ultimately, one of the biggest keys to a professional-sounding electric guitar recording—whether you’re using a mic or an interface—is to eliminate any excess noise. Maintaining your guitar is one way to get a leg up. Before recording, make sure to get a new set of strings in order to get a cleaner sound, and ensure that your guitar is properly intonated. If your guitar has any issues with fret buzz or other unwanted sounds, you may want to take it to a professional music store to get the instrument set up.

This will run you about $50 and every guitarist should have their guitar set up at least once every year or two. Also, consider applying some string conditioner to the neck and strings of your guitar to help eliminate any unwanted squeaking from sliding while you play.
Following the 3 steps listed above should get you started prepping, playing and editing your own songs in no time. However, if you’re a perfectionist like I am and are interested in honing your craft as precisely as possible, here are some added tips from the pros that can help you get the sound you’re after:
Make sure to isolate your amp from the floor.
Recording in a small space like your bedroom can mess with your sound. Having your amp on the floor, vibrating into the floor and walls of your house, can deaden the sound and make your guitar sound boxy and weak.
Try putting some insulation under your amp to keep your amp from resonating with the floor and you should notice a difference right away. Typically this will make your electric guitar recording easier to mix in the long run as well by helping to avoid any unnatural peaks or troughs in the frequency spectrum.
Know your recording space.
One problem that comes with using a loud amp in a small space are standing waves. Standing waves occur when the sound waves coming from your amp reflect off the walls of your room and interfere with the original sound waves.
To combat this, try angling your amp at 45 degrees to parallel walls, or using furniture like a heavy couch against the wall to try to eliminate reflections. This should help keep frequencies from building up and feeding back in the room. This is a trick I use personally all the time, at home and when playing shows in small venues.
Understand EQ.
Amps and guitars come pre-made with all sorts of knobs to adjust bass, treble, mid, gain and everything in between. Adjust these as you like, but when it comes to electric guitar recording you want to start with something clean and precise to work with later in the mix. While high gain or boosted bass may sound good to your ears, through a mic it will typically be a bit much, so keep your gain down a bit and your EQ closer to center than you have it set up live.
One advantage of using a mic is the ability to accent certain frequencies by mic placement alone, so be sure to experiment with placement alongside EQ to find the most natural position. Generally, mMoving your mic closer to the center of the speaker will bring out your high and low ends while moving your mic to the outside of the speaker will bring out your mids. Also, angling your mic outward will reduce upper mid tones while angling your mic inwards will increase lower mid tones.
Don't use too much reverb.
It can be great live, but too much reverb on the front-end can really muddy the sound of an electric guitar recording. Unless you're in a surf rock or chillwave band, or want to sound like you're playing in a cave, use it lightly. You can always go back and add more later on.
Use the appropriate pick.

Pick material and thickness can really influence the overall sound of your guitar. At Stringjoy, we have lots of different shapes and thicknesses to help you achieve the sound you're going for. Generally, using a thicker pick made of calluloid or acrylic is better for leads and solos while softer picks made of Acetal or nylon are better for subtle rhythm sections. Know what you’re going for and choose a pick accordingly.
As you've seen, you don't really need a whole lot of gear to record your playing. For a few hundred dollars worth of hardware and software, you can easily get all the gear you need (assuming you already have a computer), but don't expect your first recordings to sound professional. As with anything, this stuff takes time, but if you work at it for a while and learn as much about your DAW as possible, you'll be impressed with what you can do.
Other Posts you may like


Guitar Strings Order: How the Guitar is Tuned and Why
Best Acoustic Guitar Strings for Beginners

Two Handed Tapping: Our Top 8 Tappers of All Time
Which Guitar Strings Wear Your Fret Wire Down More?
What is Nashville Tuning? Its History, Best Guitar Strings & Uses
Guitar Scale Length Explained: String Tension & Playability
0 Responses
Leave a Reply
Your email address will not be published. Required fields are marked *


